K2 Dispatch Quickstart Guide
K2 Dispatch Quickstart Guide
The purpose of this guide is to learn the basic high-level features, that will get you up and running in a matter of minutes. Use of the system is secure.
System Requirements:
A Windows 7 or later PC, a USB Mic (or built-in), and speakers.
Installation:
Follow and install the software download link received in your email. You will be provided with an account username/password. Install the PC software. Run the program.
Run The Software:
You will be prompted with a login screen:

Enter your credentials — username/Password - and select Area.
Once you've logged in, you will see the following screen:

Radios online will be displayed in blue on the screen. Offline radios are greyed out.
On the left side of the screen, all available groups will be displayed.

The arrow indicates which group the dispatcher is actively speaking to.
Top Menu

Exit - Logout from the system
Refresh - Refreshes the network connection.
Group PTT - Talk to Select Groups (white arrow Indicator shows selected talk group)
All Call - Broadcast to all Groups Simultaneously.
Call Logs - Allows view all current call logs stored on your local PC (Must be in full-screen view, this is displayed right column).
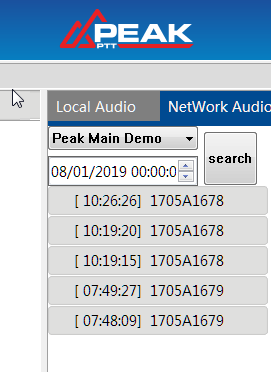
Local/Network Audio
Local audio is files stored on your local PC generated by the dispatch software.
Network audio is stored on the server and can be retrieved and played back by date.
Contacts

The contacts list will also appear in the right column. You can initiate a private 1-1 call by double-clicking any available online device.
Options
This allows you to set your time zone, as well as set the PTT Hotkey on your computer. Note: Please do not check the 8kb voice codec setting, this will distort the dispatcher transmissions and make it garbled.
Toggle Map Button

When selected, this will display your radios on a map screen. When users transmit, you will be able to easily identify who is talking as the system shows a broadcast icon next to each user.

Specific Actions For Individual Users
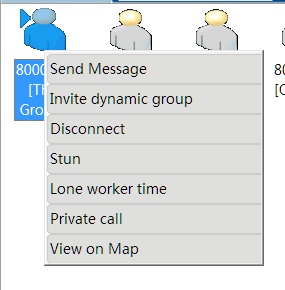
Send Message: Send a one-way message to the device.
Invite Dynamic Group: Create a group on the fly, once the dispatcher returns to a primary set group, the dynamic group is removed.
Stun: USE WITH CAUTION, will knock radio offline, and can only be re-enabled by contacting support@peakptt.com.
Lone Worker Time: Set a time variable, if a user does not transmit within the set time parameter, the dispatcher will be notified.
Private Call: Initiate a 1-1 private call with a user.
View On Map: View device location on dispatch control map.
Show Location History: From View On Map, a dialog box will appear,

You will be able to query tracking for a previous period of up to 12 hours previously. Historical tracking data is stored on our GPS tracking portal, Cronus for up to 90 days, if you need to retrieve previous location points.
SOS Notification:
On the radio, the SOS mode must be active. PTT-84G > Menu > (Advanced) Settings > SOS Mode > Select Hot Mic/Normal to enable.
To activate SOS, the user must depress and hold the SOS button on the radio for 3-5 seconds.
Dispatch Console will alarm, with an audible and visual alert:

Clicking Display on the map will show radio location on the map.
Additional Map Features:

Latched Calling Position: When enabled, will display current radio transmitting position on the map.

Realtime Location: Shows current location of active users.
Last Location: Shows last known location of users.
Online Users: Shows online users.
For additional questions, please contact Support.